|
How To Install The Crown-o-matic Device
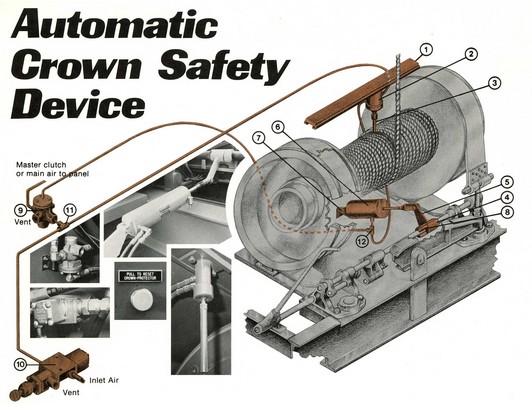
Complete Crown-o-matic Parts List 1. Install toggle valve track [1] over top center of drum and weld it to the drawworks housing above the drum. Check to make sure the track [1] is high enough when the toggle valve [2] is installed in order to allow the wraps of wire line to pass under the toggle valve lever arm [3] until the proper height of the traveling block is the derrick is reached for the desired Automatic Crown Safety Device setting or shut-off. The lever arms [3] on the toggle valve [2] may be cut to fit a specific drawworks and also adjustable.
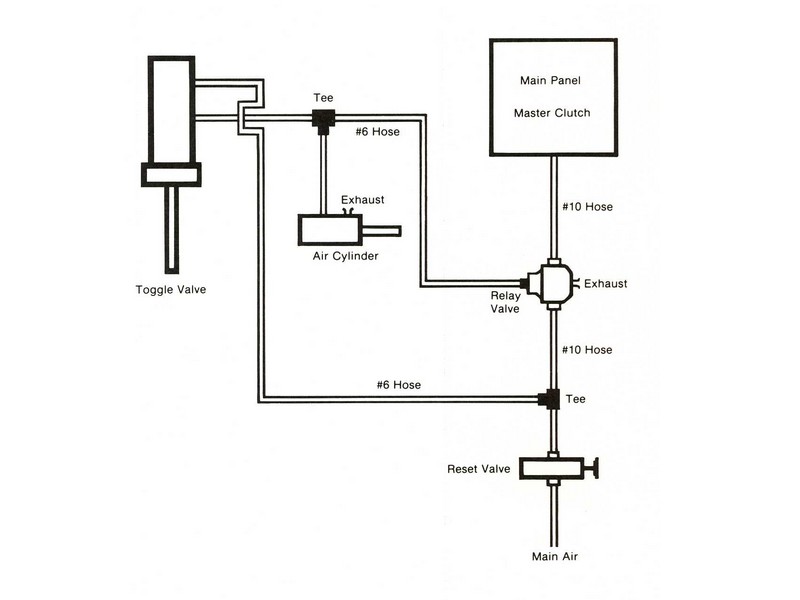
2. Install jaw clutch [4], lever [5] and air cylinder [6] on main brake shaft under the drawworks drum. Be sure that these parts move freely. Weld or bolt the rear air cylinder bracket [7] to the drawworks or steel beam on the most desirable location for alignment keeping cylinder level when completely retracted. (Cylinder also can be mounted vertically.) Bolt the air cylinder to the lever [5] on the jaw clutch [4]. Pull the brake down tight. Cylinder should be completely extended. Then, push the cylinder back so that approximately three inches of travel are left in the cylinder after the brake is applied. Weld the half-circle dog [8] to the brake shaft so that it fits flush with the dog on the clutch [4]. Mount the air relay valve [9] inside of the driller’s control box or other convenient location. Mount the three-way valve [10] at a convenient place between the control box and the drawworks so that it can be shut off easily for rest of the brake air cylinder [6] after the toggle valve [2] has been tripped by the wire line on the drum.
3. Disconnect the main air supply going into the control panel. Run the air hose to the inlet side of the three-way valve [10] from the incoming air supply. Run an air hose with a tee [11] in the line from the outlet at the three-way valve [10] to the port shown on he air relay valve. Run an air hose from the tee [11] to the inlet of the toggle valve [2]. From the outlet of the toggle valve [2], run an air hose to the cylinder [6] with the tee [12] in the line. From tee [12] run an air hose to the port on the air relay valve [9] as shown. Run an air hose from the port on the air realy valve to the control air manifolds in the drillers control panel.
4. Set the Automatic Crown Safety Device by first pulling the traveling block 25 to 40 feet above the derrick floor. Set the toggle valve [2] to trip at the desired height above the floor, then let the block down and run the block up again past the setting in or der to check the entire installation to see if everything operates correctly. CAUTION: Do not get in the way of the brake lever on the drawworks when this check is performed. The Automatic Crown Safety Device is now ready for the final setting. Pull the traveling block up tin the derrick to the desired height of shut-off point, then loosen the set screws that position the toggle [2] on the track [1] and move the toggle valve [2] into position as shown. At this point, one more wrap of line on the drum would actuate the Automatic Crown Safety Device, turning off the air to the drillers controls, setting the brake on the drawworks and preventing the block from bumping the crown. Retighten the setscrews after placing the toggle valve [2] in position. If the lever arm [3] on the toggle valve [2] is too long, cut it to fit. There also is an adjustment on the lever arm [3]. Be sure that the toggle valve [2] is tight in the track at all times. Keep the seat that holds the toggle valve’s lever arm and ball tight and greased. It should be able to work free when jammed tight on the seat.
5. To release the Automatic Crown Safety Device after it has been actuated, first turn the three-way valve [10] to bleed the air off the cylinder [6] that has automatically set the brake. Then, push the air cylinder [6] all the back and be sure that all air is out. Let the wire line run off the drawworks drum until the wire line is out of the way of the toggle valve [2]. Next, place the toggle valve lever arm [3] back in its original vertical position and close the three-way valve [10]. When the three-way valve [10] is closed from the exhaust port, the airflow then is opened to the driller’s controls for normal operations.
|

